I know this is similar to the G8 (see Cabin Air Filter DIY), and that there is an instruction sheet for right hand drive cars included with the filters, but our cars are just different enough that I thought some pictures of the swap process might be helpful to somebody.
According to the maintenance schedule this is due for replacement every 22,500 miles or 2 years.
Tools Needed:
Small flat head screw driver
Fender cover or towel to protect the car while you lean into the engine bay
Optional:
Beer or Gatorade (as needed)
Part:
ACDelco CF182 ($28.92 shipped from Amazon; RockAuto and others carry this and other options as well)
Steps:
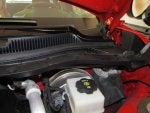
1: Open the hood. Bask in the view, cover your fender, and then get to work.
2: Using a flathead screwdriver, pop up and remove the centers of the retaining clips. Remove the rest of the clip by squeezing together and pressing from the underside. Remove all 7 clips from the passenger side to the split in the cowl cover.
(see attachment 1)
3: Remove the hood gasket from the driver's side to just beyond the split in the cowl cover. This lets you get the extra lift on the cover that you need to work. The large triangle topped piece is glued in place, but there is no need to mess with it. The gasket pops off of that and then is hooked onto the cowl cover. Gently pull along the gasket to locate each point where it is secured. Pinch the gasket, pull toward the driver's side and up until the gasket is released from the hook.
(see attachment 2)
4: Once the gasket is released, gently pull apart the two sides of the cowl cover so that the passenger side can be lifted independently of the driver side. If you are an overachiever, I suspect you could remove the wiper arm and remove the entire cowl cover.
(see attachment 3)
5: Lift up on the cover, reach in, and vacuum out any dirt and debris you can access. A long, narrow, and flexible attachment is a big help here. I used a crevice tool from a Dyson car care kit.
(see attachment 4)
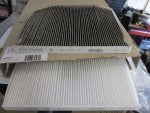
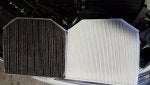
Remove the old filter. Pay attention to how you have to twist the older filter to remove it, because you will have to use the same motion to install the replacement. Vacuum again to get anything that was trapped against the old filter.
New and old filters.
(see attachment 5)
6: Noting the air flow direction indicated on the filter (arrows should be facing the blower, toward the back of the car), twist the new filter to slide it into position. I found positioning this to be a little tricky, both manipulating it into position and properly seating it once there.
(see attachment 6)
7: The left side of the filter should rest into a slot just beyond the curve of the box. Push the bottom left too much and it will buckle and slide into the intake area, leaving a gap for debris. The right side sits just inside the bar visible in this picture. There is an upright piece on the bottom at the midpoint (not visible here) and the filter should be resting against it. Position the bottom first, then gently press the top edges in along the top opening. If the filter appears buckled or compressed oddly then the bottom likely slid out of position, and you will need to re-position the filter.
(see attachment 7)
I hope this helps!
According to the maintenance schedule this is due for replacement every 22,500 miles or 2 years.
Tools Needed:
Small flat head screw driver
Fender cover or towel to protect the car while you lean into the engine bay
Optional:
Beer or Gatorade (as needed)
Part:
ACDelco CF182 ($28.92 shipped from Amazon; RockAuto and others carry this and other options as well)
Steps:
1: Open the hood. Bask in the view, cover your fender, and then get to work.
2: Using a flathead screwdriver, pop up and remove the centers of the retaining clips. Remove the rest of the clip by squeezing together and pressing from the underside. Remove all 7 clips from the passenger side to the split in the cowl cover.
(see attachment 1)
3: Remove the hood gasket from the driver's side to just beyond the split in the cowl cover. This lets you get the extra lift on the cover that you need to work. The large triangle topped piece is glued in place, but there is no need to mess with it. The gasket pops off of that and then is hooked onto the cowl cover. Gently pull along the gasket to locate each point where it is secured. Pinch the gasket, pull toward the driver's side and up until the gasket is released from the hook.
(see attachment 2)
4: Once the gasket is released, gently pull apart the two sides of the cowl cover so that the passenger side can be lifted independently of the driver side. If you are an overachiever, I suspect you could remove the wiper arm and remove the entire cowl cover.
(see attachment 3)
5: Lift up on the cover, reach in, and vacuum out any dirt and debris you can access. A long, narrow, and flexible attachment is a big help here. I used a crevice tool from a Dyson car care kit.
(see attachment 4)
Remove the old filter. Pay attention to how you have to twist the older filter to remove it, because you will have to use the same motion to install the replacement. Vacuum again to get anything that was trapped against the old filter.
New and old filters.
(see attachment 5)
6: Noting the air flow direction indicated on the filter (arrows should be facing the blower, toward the back of the car), twist the new filter to slide it into position. I found positioning this to be a little tricky, both manipulating it into position and properly seating it once there.
(see attachment 6)
7: The left side of the filter should rest into a slot just beyond the curve of the box. Push the bottom left too much and it will buckle and slide into the intake area, leaving a gap for debris. The right side sits just inside the bar visible in this picture. There is an upright piece on the bottom at the midpoint (not visible here) and the filter should be resting against it. Position the bottom first, then gently press the top edges in along the top opening. If the filter appears buckled or compressed oddly then the bottom likely slid out of position, and you will need to re-position the filter.
(see attachment 7)
I hope this helps!